/Logos/WWW-og-black.png?width=1019&height=851&name=WWW-og-black.png "wild we wander")

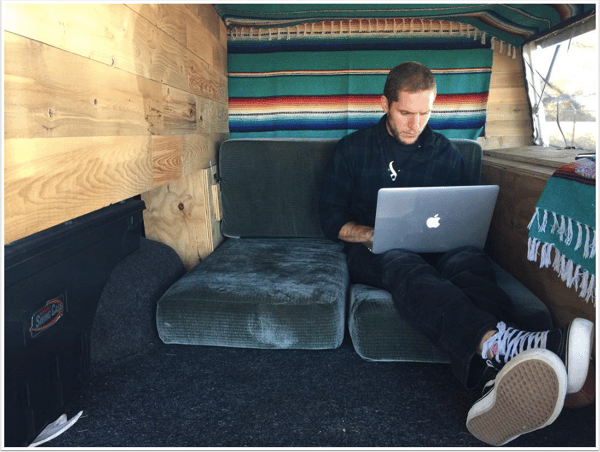
We’d love to show you exactly how we did this project because this mobile movement isn’t just for millennial music festival- goers. It’s for anyone looking to bring out the wild in themselves. Whether you're an aspiring full-time RVer or a weekend adventurer, this conversion project is for anyone looking to get outside more often and for longer periods of time.
Read on:
We’ll guide you
Here's what you'll learn to DIY a truck camper of your own: 8 steps
Follow the link for each product to view on Amazon.com. Keep in mind, the cost of products can fluctuate.
|
Product |
Price |
Quantity |
Total |
|
$35.43 |
2 |
$65.98 |
|
|
$9.99 |
5 |
$49.95 |
|
|
$5.77 |
1 |
$5.77 |
|
|
$20.66 |
5 |
$103.30 |
|
|
$35.04 |
1 |
$35.04 |
|
|
$5.04 |
1 |
$5.04 |
|
|
$3.92 |
1 |
$3.92 |
|
|
$8.00 |
1 |
$8.00 |
|
|
$559.00 |
1 |
$559.00 |
|
|
$189.00 |
1 |
$189.00 | |
| 15 ft. Charging Cable For EcoFlow RIVER | $24.98 | 1 | $24.98 |
|
$669.00 |
1 |
$669.00 | |
|
$15.99 |
1 |
$15.99 | |
|
$7.78 |
1 |
$7.78 | |
|
$24.88 |
1 |
$24.88 |
|
| BedRug | $399.00 | 1 | $399.00 |
| Tailor |
$12.99 |
1 |
$12.99 |
| Phone car mount | $12.99 | 1 | $12.99 |
| Emergency roadside kit | $24.99 | 1 | $24.99 |
| TOTAL | $1,529.11 |
The only items not on the list are eight 5/8” bolts, washers, and nuts and Timberchic for the reclaimed wood wall. Check out your local hardware store for
If you don’t have any of the tools listed, then we recommend heading to Amazon.com or your local hardware store.
We’ll show you how to complete each project step-by-step. However, for bigger projects like weatherizing your truck cap, it may be a good idea to look for resources in your area. If you’re a true DIYer and you want additional assistance outside of this ebook, then YouTube is a great resource to find helpful tutorials.
Patience leads to a more level head, which means a solid finished product. Mistakes are bound to happen, even with a step-by-step guide. Enjoy the process of each step as you perform it.
When we started this conversion project, we were novice construction workers. When Justin bought our set of Milwaukee 18v power tools, he had to go to Home Depot and ask how to put the drill bit in the hammer drill. We all have to start somewhere; don’t be embarrassed to ask those who know what they’re doing for help. We grow through learning.
The majority of the research and ideation was done online. The great thing about the Internet today is so many people are creating valuable, helpful content and most of it is free.
After many hours online, we identified a system for uncovering answers to questions or problems with next step action items. Here are three tips
If we can renovate our truck in a city, we think anyone can find a working space. Ideally, you have your own garage, land, or know someone that’s willing to let you work in their driveway.
But if not, you can still figure it out. If you do live close to other people and do not have a driveway, you’ll have to learn to be stealthy. Here are some incognito tips that worked for us:
George is outfitted with

We recommend the DCU truck cap for a camp conversion because it offers:
Brand new, these truck caps can go for $1,500+. However, you can find great deals on Craigslist. We purchased ours for $650; retail price for our cap was $2,100!

Also, we decided to put a ladder rack on the top for two reasons:
The ladder rack cost about $350, which includes installation. If you don’t already have a truck cap, then definitely keep an eye on Craigslist for a DCU unit with one.
There will be times when you get frustrated. There will be times when you make mistakes.
What will keep you going is surrounding yourself with people that believe in what you

Thank you to all of our friends and family for your encouragement and support through this process. You helped us keep our eyes on the prize.

Every shelter needs to be protected from the outdoors. No one enjoys raindrops splashing on them when they’re trying to sleep or waking up in a cold, damp space. When we purchased our A.R.E. DCU truck cap, we didn’t have all the materials to seal or secure it to our f250, George. We placed the utility cap over the truck bed, used two clamps on the passenger side to secure it down, screwed in a bolt on the driver side, and called it a day. Because we’ve never had a truck before, we didn’t know it would need to be weatherized; you live and learn
Once we decided to convert George into a truck camper to travel with our tiny home, Virginia Blue, weatherizing and securing the truck cap came in at the top of our list.
Materials needed for this project:
Tools needed for this project:

First, spread out a blanket that’s bigger than your truck.
Next, have someone help you flip the truck cap upside-down and lay it down gently on the blanket.
Apply adhesive truck bed insulation tape around the entire bottom of the truck cap, except for the rear hatch. If you cover the hatch area you won’t be able to open and close your tailgate easily. You may want to add a few layers of tape to the bulkhead to ensure nothing gets in or out.
Open the tailgate to your pickup truck. Have someone help you flip the truck cap right side up and carefully place it onto the pickup truck bed. Make sure the truck cap sits evenly on both sides of the truck bed.
Get yourself into the back of the truck bed and bring two aluminum hardware clamps with you.
Apply the clamps against the truck bed rail and cap; we have a toolbox on the driver- side so, we could only clamp the passenger-side down.
Next, drill three holes on both sides of the truck cap about 24” to 30” apart. There may already be holes in your truck cap, but don’t be afraid to drill new ones if you need to. We have a 6.5’ bed, so if yours is longer then you may want to drill a fourth hole.
Next, place a washer on each bolt and place in the hole you drilled. Once all bolts are in place, screw in the locking nuts to secure the truck cap in place.
Next, determine if there’s a hole near the right rear tail light assembly for the wiring of your truck cap taillight. If there’s not, then you may need to drill a small hole.

Remove the taillight assembly from the truck cap to locate the wiring. Find the wire and make an incision, strip the casing, and butt connect the high mount brake light.
Pull back a piece of insulation from the brake wire and connect the high mount stoplight wire to the truck’s brake wire.
Connecting the brake light is a tedious process, one we had help with to ensure we didn’t mess up George’s wiring. If you want further assistance on how to do this, then head to YouTube and type in “wiring truck cap tail light”.
And there you go! Now you have a weatherproofed truck cap. Now you’re ready to start the rest of the transformation.
Every shelter needs to have a comfortable space (or, at least it should). We thought about making something, like custom cushions, but what we really wanted is something that molds to the design of our specific truck bed.
We did some research on Google for “comfortable truck bed floors” and low and behold, we found the BedRug Bedliner, a solution practically made for our project. A BedRug solved our needs, as it has the look and comfort of carpet, yet is super tough and can withstand any harsh elements you throw its way; not even battery acid could phase it. Plus, it’s made with 3/4” foam, similar to that of life jackets, so it does not absorb liquid.
Materials needed for this project:
Tools needed for this project:

If your truck bed has a bed liner, then you’ll need to remove it. We had a Rugged Bed Liner which came with our truck when we purchased it.
The Rugged Bed Liner is a bit rigid--it’s made from a solid piece of plastic–and was installed without any bolts. we tried our best to yank it out from under the bed rails without breaking or tearing it. This way, you might be able to make a few dollars by posting it to Craigslist (we ended up getting $50 dollars for it).
Once everything is removed from the back of the truck bed, remove the four tie down hooks in each corner and clean out the truck bed. If you have an older truck, then these tie down hooks will be in there pretty tight.
If you want the BedRug to install properly, then make sure you’re starting with a clean truck bed. Sweep all debris and dust out and spray with a hose.
Remove the BedRug from the box and read the installation instructions (pretty basic stuff). First, zip the BedRug together. Take your time with this step as the BedRug has been folded up and the zipper may take a few times to follow its track.
Pull the BedRug into its secured position. It's kind of an awkward piece to get in there so Justin had to crawl underneath the BedRug and yank it towards the bulkhead.
It’s important to note that you should not start placing VELCRO down until you’re sure the BedRug is the correct fit and you’re satisfied with where it’s placed. While VELCRO is removable, it’s not fun to install and you don’t want to lose your cool and start kicking things.
Start applying the VELCRO strips throughout the truck bed per the instructed areas. We placed the VELCRO strips in the following order:
Once all pieces are placed in the specified areas, select an area (from above) and pull the BedRug back keeping it from contact with the truck bed, remove the adhesive protective film and carefully place the BedRug into its secured position.
Wash, rinse, and repeat this process until all areas are completed.
Make sure to do a once or twice over across all areas, checking that the adhesive was applied and make sure that everything is secure.

Pull back the VELCRO in the areas where the tie down hooks are located to determine proper position. Cut two small holes for the screws in each location, then re-install the VELCRO so the BedRug is in its secured position and screw in each tie down.
Note: To save yourself time with the next project, make sure to flip the tie down on the back driver-side of the truck bed. If you forget this step, the Swing Case won’t close. We learned this through troubleshooting during the next project.
You’re done! Now you can sit back and enjoy your new comfortable truck bed. We actually hung out in the back of the truck bed the rest of the afternoon.
Ever since we decided to convert our truck, George, into a functional living space, we dreamt of a reclaimed wood wall. Not only would it cover the industrial makeup of our A.R.E DCU truck cap, but it would also create that homey feel of being in a cabin.
There’s nothing pretty about the interior of a DCU truck cap. It’s built for function, not style. The layout is basically a blank canvas, which lends itself to endless creative possibilities; the driver side toolbox has a flat surface and the ceiling and side walls are made up of 1” thick square aluminum. With the right mindset, the interior could be seen as framing, similar to that of a house. It’s a perfect setup for a reclaimed wood covering.
While cruising through Facebook, we came across our friends’, Samantha and Rob, stunning lake house rental project in Maine. They were using this beautiful reclaimed wood throughout the house and we saw they tagged this company called Maine Heritage Timber. Excited to learn more, we talked to them about the reclaimed wood product and they explained that Maine Heritage offers many different varieties, including a thin reclaimed wood option with a peel-and-stick backing for easier installation–this is exactly what we’re looking for.
Additionally, they explained that Maine Heritage’s products are made with preserved growth timber and reclaimed wood from the bottom of the Penobscot River (the byway that once made Bangor, Maine “the lumber capital of the world”).This is the type of history and product that George would be proud to be outfitted with. We checked out Maine Heritage’s site and learned that they offer free samples, so we put in a request.
Once we received the reclaimed wood samples, we fell in love. What’s interesting about Maine Heritage’s thin peel-and-stick product, Timberchic, is it comes in many different sizes (width and length) and colors.
Materials needed for this project:
Tools needed for this project:
Peeling-and-stick one plank at a time to cover the flat toolbox surface. Start at one end and work your way to the other end. It’s like a game of Tetris.
Before installing each plank, make note of the holes in the wood and place the circular black stickers that come with the wood in these spots to cover the white of the toolbox.
We were pleasantly surprised with how sticky the adhesive tape took to the aluminum surface it was placed on. The only way this wood is coming off is if you break it.
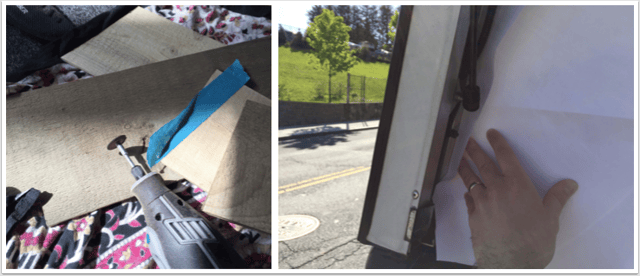
Once you reach the bulkhead, you’ll need to cut the Timberchic pieces to match the tailgate end. We used a Dremel for this, as the reclaimed wood is about 1/8” thick and we wanted to treat the wood with care.
To make this process easier, measure where the plank will be cut before installing on toolbox and use painters tape to make a straight line. To finish the toolbox section, start by folding an angle on a sheet of paper on the far left wall. You’ll use this to mark the Timberchic and make a cut that fits flush with the wall. This may sound make-shift, but it works.

Once you use the paper to make your first cut, use this wood panel as a template to place painters tape on the remaining pieces to be cut; all angles are the same on the tail gate and bulkhead.
The only areas that will need extra cuts will be the bottom and top planks. You’ll have to cut a 90-degree angle slice out of the wood to fit in smoothly.
Again, the reclaimed wood is fairly thin, so the insulation tape provides a cushioned backing for support so it won’t break if pressure is applied to it. Spread the stripping out on the lower part of the truck cap and the sides, no more than 5” apart. Too much of a gap will create a weak spot, increasing the chance of the wood breaking if pressure is applied to it.

Per our earlier notes, the make-shift measurement we took at the back of the toolbox will be the same for the bulkhead installation. The only difference is the top plank will need to be rounded off.
You'll notice there's about 1 1/4" gap between the top reclaimed wood panel and the roof. This is because you’ll be installing industrial strength VELCRO for the bulkhead curtain. Plus, the serape blanket ceiling will cover this up anyway.
We decided not to place reclaimed wood on the underside of the toolbox, as we want to leave our options open in the future for a shelving unit. And there you have it! A reclaimed wood wall for your truck camper living area.
Of all the projects to help transform our f250 into a truck camper, the ceiling cover and curtains process was by far the most tedious, yet rewarding. However, if you want the job done right, the first time, then you need a steady, caring touch and a lot of patience.
The first time around, we’ll admit, we rushed installing the curtains and ceiling cover. We have had some setbacks that kept us from our deadline, but were determined to finish on time. Doing so, we didn’t have the patience to complete a project well and our mistakes slowly crept up to bite us.
Our biggest mistake and regret which led to us having to redo everything; gluing as we installed as opposed to letting the glue dry for 24-48 hours. The glue seemed to dry fast enough, so we thought It would be okay. We thought wrong. Additionally, we didn’t apply enough glue in the areas that needed it. While this mistake was 50% patience, 50% DIY newb learnings, it’s something that we may have noticed if we were working with more of a caring touch.
If you want results that you’re proud to have your name attached to, then you need to give it the time and care it deserves. Justin was reminded of this when walking back from lunch one day with one of his colleagues who told him to practice patience. Even though this was not a new concept, it’s important to be reminded. It’s as if we were in our corner during a boxing match, having lost sight of our end goal, and had the words we needed to get our head back in the fight.
We’re telling you this before we share this DIY project, because we want you to learn from our mistakes. We all have obstacles that make us pivot and adjust to reach our end goal. In the words of the great Red Auerbach, “be quick, but don’t hurry.” Say this to yourself whenever you’re up against a deadline and you’re feeling it slip away from you.
Materials needed for this project:
Before purchasing any of the above materials, measure the interior of your truck cap: length, width, and height (truck bed rails to the floor). Our A.R.E. DCU utility truck cap is outfitted with 1” aluminum framing, so we measured the length and width of each aluminum rail.
To make it easier on yourself, we recommend using a flexible measuring tape. This way you can move around with ease, as the working area can be tight.

Using the measurements of the truck bed interior, draw a simple pattern of your design with a pen and paper. Measure everything again to make sure the pattern dimensions are correct. If everything checks out, then you’re ready to purchase your materials.
Final thought; there will be two aluminum rail cutouts for the bulkhead curtain to fit into place. This is the only area that will require you to cut into the blanket, as seen below.
Whether your truck cap is used or new, clean the area where you’re going to apply the VELCRO strips. In this case, the VELCRO is going to cover all ceiling rails as well as the curved side rails leading up to the access door(s). This is an important step as a dirty truck cap can impact the bond of the VELCRO.
Use the measurements from your pattern to cut precise VELCRO strips. Try to be as exact as you can, as the longer the strip the stronger it’ll be. Tip: Because this is industrial strength VELCRO, make sure to use the rough side–also known as the hook–on the ceiling. This way the softer side applied to the blanket–also known as the loop–won’t stick to the BedRug floor.
Regarding the curved aluminum area, the VELCRO won’t stick here very well (learned that the hard way). Instead of cutting one long strip of VELCRO for the aluminum rail, cut the VELCRO just before the curve and cut 3” pieces of VELCRO that attach to the side of the railing. This will help reinforce the grip and keep the blanket from sagging around the curve.

Remember, the VELCRO strips are 2” wide, but the the aluminum framing sizing varies. This means you’ll need to cut the strips according to each area it will be applied. The cuts don’t need to be exact, but try and cut as straight a line as you can.
To make this process easier, try and find two measurements that are somewhat equal, like the length-wise aluminum framing from the bulkhead to the tailgate. This way one cut will equal two installations (with the addition of minor cuts if needed).
Once all the aluminum rails are dry, outline each railing with the cut-to-size VELCRO strips.
Mark up the blankets with a Sharpie based on the pattern measurements:
Make sure the side you mark up is the side that will be facing the ceiling.
We used one blanket for the roof and one blanket for the curtains (the tailgate curtain attached to the ceiling curtain to make up for the 6” ceiling gap). Try and mark cuts that preserve the blanket's edges. This way you’ll reduce having to glue seams.
Tip: Be extra careful with your blanket edge cuts. The blankets can become frayed if they go without glue for long. Use the Fabri-Tac to glue your seams.
Here is a good technique to adopt for a longer-lasting bond between the VELCRO and the blanket; spread out the Fabri- Tac glue on the adhesive side of the VELCRO before placing on the blanket. Once placed, add Fabri-Tac glue around the sides of the VELCRO. This will strengthen the bond between the blanket and VELCRO.
DO NOT skimp on the above step when applying the VELCRO to the blankets. Remember, practice patience and make sure your VELCRO is good and bonded to your blankets. Once all the glue is applied, let it sit for up to 48 hours. Once dried, tug on all the areas of the VELCRO and make sure it's on there to stay. If you find an area that needs an extra caring touch, then help it out with some Fabri-Tac.
Once you feel good about the VELCRO-to-blanket bond, you're ready to install.
Start by installing your bulkhead blanket. Attach the blanket's VELCRO to its counterpart at the top of the bulkhead. Next, install the ceiling cover. Start by attaching the VELCRO to its counterpart on the toolbox-side strip that extends from the bulkhead to the tailgate.
Next, Attach the middle intersecting VELCRO strip to its counterpart. Then attach the remaining VELCRO strips to their counterparts. Installing the blanket roof in this way will help reduce excess sag, keeping the blanket taught and in place.

Lastly, install the tailgate curtain. Start by connecting the blanket ends where the VELCRO hook and loop meet to complete the ceiling cover. Connect the blanket to the aluminum framing above the tailgate. Make sure the blanket is nice and tight from the adjoining ceiling-to-tailgate connection.
Next connect the VELCRO adjoining strips to their counterparts above the tail gate and let the blanket hang down to the floor.
And there you have it. Making use of a blanket as curtains and a ceiling cover in your truck camper project.
The ability to plug a cord into an outlet and access electricity is nothing short of magical. Sometimes, we on-grid folk don’t take the time to appreciate the intricacies that go into building an electrical system. That is until there’s a blackout…
While we don’t live in our f250, George, it is nice to take him out on solo excursions without the Airstream. Installing an electrical system gives us the ability to access power when we need it.
When we started doing research, we found many options, including several off-grid emergency systems created by expert, Steven Harris. That being said, most creations are a bit more involved and complicated than we were looking for.
Our goal was to keep this project simple and identify easy to install methods for accessing power when we need it.
Materials needed for this project:

Cut a strip of loop (soft) and hook (rough)-sided industrial strength VELCRO about 5” long. Attach the hook-sided VELCRO to a flat surface under the cigarette lighter port; attach the loop-sided VELCRO to the flat side of the power inverter. This will allow you to connect the power inverter to the truck and easily remove when parked.
Now you can leverage your truck to charge your smaller devices (smartphone, laptop, etc.) while you drive.
Powerfilms 60 watt adhesive solar panel is easy to install. You just peel back the protective layer from the adhesive and apply to the roof. Below is a list of suggestions to consider:
Make sure to do the above carefully, because once you apply the solar panel to your roof it's not coming off.
What we love most about our ECOFLOW River is it has a built-in charge controller, making it a plug-and-play solution. Depending on where the River is located, below is how we ran the cord:
Both of the above options are watertight, so don't worry about water getting in.

Start by measuring the ceiling area to make sure 33’ will be enough to cover the area. We have a 6.5’ short bed, so we were almost able to cover the entire area twice.
Next, attach the LED string lights to the serape blanket along the path you measured. Ariele did this with black thread and a needle, sewing it to the blanket ceiling cover about every 6”.
If you want a tour of our electrical set up, then check out the video below:
We didn't realize how important a screen for our truck camper conversion was until the first time we camped in our truck bed. The A.R.E. DCU utility truck cap access doors provide amazing panoramic views. But, without the rip-away screen we wouldn't be able to sit comfortably in our truck camper with the access door open. No matter the weather, the rip-away screen allows us to let fresh air circulate the truck bed while keeping insects out.
Materials needed for this project:
Tools needed for this project:
Start by measuring the length and width of the access door where you're going to place the rip-away screen. This will give you a pattern with which to cut your screen. To be safe, make sure to measure top and bottom, left and right. Don't assume the side parallel to the one your measuring is the same.
Make sure to measure all truck cap elements that will impact the screen cutout. For example, we added 1" to the top and bottom of our measurement to account for VELCRO placement on the truck cap.
Once you have established your screen placement, you can cut 1" VELCRO strips using the hook side to outline your truck cap. Make sure to use the non-fabric shears for this. When applying the VELCRO to the aluminum surface, make sure everything is clean and dry. This will help ensure a strong bond between the VELCRO and truck cap.
Take your pattern and use it to measure the cutting area on your screen. The good thing about cutting along a screen is there are tiny little boxes you can use to cut a straight line–you just have to cut within the parameters of the box, using the lines as a guardrail.

Once you have your screen cut out, lay it flat. Based on the pattern, cut 1" VELCRO strips that measure the border of the screen. Make sure to use the loop side of the VELCRO, which is the soft side. This way, it won't stick to your BedRug.
Before applying the VELCRO to the screen, apply Fabri-Tac to the adhesive side of the VELCRO strip and spread it out like you're making a peanut butter and jelly sandwich.
Next, apply the adhesive side of the VELCRO strips to the screen. 
Make sure the VELCRO is facing the floor, as the glue will seep through and you don't want to have the screen dry to the floor. Hold the screen in your hand as you do this.
Now, let it sit for 24-36 hours in a place where the screen won't be touched. Once everything is dry, you're ready to apply the backing tape. We chose hockey tape, as it's fabric based.
Before you apply the hockey tape, it's time to make another peanut butter and jelly by spreading another layer of Fabri-Tac glue on top of the screen and adhesive side of the VELCRO.
Then apply the hockey tape to the glue. Adding a layer of the Fabri-Tac will help bond the hockey tape to the back of the VELCRO. This is what that side will look like. Now, let it sit for 48 hours.

You're done! Now you can attach your screen and enjoy the breeze (and necessary ventilation!) in your truck camper while keeping the bugs out.
No one likes waking up in a damp area. Justin went camping before George’s transformation was complete. The BedRug was installed, so he knew the space would be comfortable enough.
When he woke up the next morning, everything in the truck was wet because he had to leave the side access-door open for air circulation. This was not ideal, especially since we have things back there that moisture can damage, like our reclaimed wood wall or ceiling cover and curtains.
After doing some research we found the Eva-Dry Mini Dehumidifier, which offers the following benefits:
We LOVE this product. We tested it out by sleeping with the side access-door open and woke up to a completely dry environment.
Our A.R.E DCU truck cap has a tool box on the driver side that extends the entire length of the truck cap. From tools and supplies to personal items, the tool box is a helpful addition and a very wise use of space. However, this storage area can only be accessed from the outside.
If you plan on sleeping and hanging out in the truck bed, then you’re going to need storage inside the truck. Our truck bed storage goal was twofold: something small and out of the way that can also serve as a cooler (like a short- term ice box).
After going to the all-mighty Google to find options, we found our unicorn; the UnderCover Swing Case. This beaut is exactly what we were looking for, and more.
While the installation of the Swing Case is a fairly simple process, having a BedRug Bedliner, which is about 3/4” thick, makes this process a little more tedious.
Materials needed for this project:
Tools needed for this project:
Screw the mounting brackets together, making a capital “T” shape on its side.

This is where things get tricky. The Swing Case doesn’t account for the 3/4” thick BedRug. We mounted the brackets several times and the lock just wouldn’t catch.
To make this work, you need to apply pressure to the mounting bracket, pushing it against the back of the tail light and the floor, and screw in the top and bottom screws. Don’t install all of the screws, in case you need to adjust positioning.
Next, slightly bend out the base of the mounting bracket. This helps realign the bracket, so once you secure it to the side of the truck bed, it’ll be straighter.

Mount the Swing Case on the bracket and test shutting it in the locked position under the wheel well. When trying to secure the Swing Case in its locked position, apply pressure as if you were shutting your tailgate. If it catches, then you’re golden.

Once you’re confident the Swing Case will stay in its locked position, remove it from its mount and screw in the remaining base mounting screws.
And there you have it. Now, you’re effectively utilizing the dead space under the toolbox next to the wheel well for storage.
Looking back, our truck camper conversion was one of the best, most rewarding projects of our lives. We’re beyond satisfied with the finished product and even happier that it was something we did (and completed) ourselves. We hope this guide helps inspire you to follow your dreams. Life is too short not to spend it doing something you love. Remember:
Even when you finish your truck camper conversion, the project is never really done. There’s always something that can be added, tweaked, or improved. Because we are constantly thinking of the next idea, we have a few projects that we’re already thinking of to take George to the next level.
Foam bed/couch: We’re currently using cushions from Virginia to serve as our bed in George. We’ll be buying new cushions for Virginia, so next step is cut to size the old ones to fit the dimensions of the truck bed. This will make it more comfortable and easy to set up.
Truck bed storage containers: There’s still space between the wheel wells that can be utilized. Next step is to get some storage boxes to fit between the cushions and wall.
Organize the toolbox: The toolbox area is so valuable. We learn this the more we go camping. Currently, the toolbox is outfitted with a hodgepodge of tools and supplies. Next step is to organize the tool box to include:
You never know when the mood will strike to go adventuring. Being prepared will make it that much easier.